smarty模板
smarty定界符:一定要遵守smarty规则

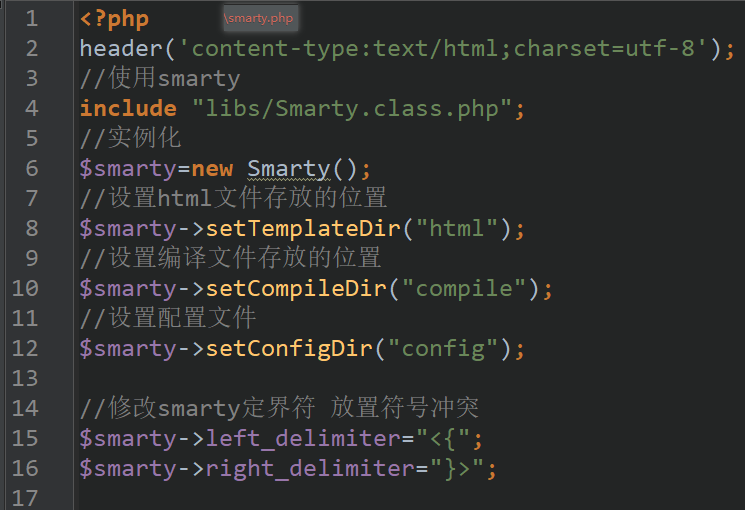
php
- 实例化
$smarty=new Smarty(); - 设置html文件存放的位置
$smarty->setTemplateDir("html"); - 设置编译文件存放的位置
$smarty->setCompileDir("compile"); - 修改smarty定界符 放置符号冲突
$smarty->left_delimiter="<{";$smarty->right_delimiter="}>"; - 创建函数
创建字符串
$name="滑稽啊";
$smarty->assign("name",$name);
$arr=['one'=>'大','two'=>'二'];
$smarty->assign("name",$name);
格式:$smarty->assign(函数名,值);
创建数组
$arr2=[
    ['id'=>1,'name'=>'国毅','hobby'=>'遛鸟'],
    ['id'=>1,'name'=>'京东','hobby'=>'看鸟'],
    ['id'=>1,'name'=>'宏安','hobby'=>'烤鸟'],
];
$smarty->assign("arr2",$arr2);
- $smarty->display(“index.html”);
html
提取php分配过来的变量 html中引文<{include file=”common/head.html”}>
- 使用php中的变量
```<{$arr['one']}>``` 或者 ```<{$arr.one}>```

2. 使用foreach循环

```php
<{foreach $arr as $k=>$v}>
循环条件
<{/foreach}>
- 使用三目运算符
4. if分支

栗子:	```style="color:<{if $k==0}>red<{elseif $k==1}>green<{else}>blue<{/if}>;"```

5. 插入图片

```html
<!--插入图片 要以php文件为基准-->
<img src="img/1.jpg" alt="" width="100" height="100">
- 时间格式
<{$time|date_format:"%Y-%m-%d %T"}>
<!--详情请看手册《smarty3中文手册.chm》-->
- 截取
<{$title|truncate:60:'···':false:false}>
<!--详情请看手册《smarty3中文手册.chm》-->
- config配置文件
在html页</head>和<body>之间加入代码
<{config_load file="color.conf"}>
在html页<body>中添加背景颜色样式bgcolor
<body bgcolor="<{#bg#}>">
新建文件color.conf
bg=yellow
注意:引文步骤(一般在总引文中设置)
//设置配置文件存放的位置
$smarty->setConfigDir("config");
在php页面中注意smarty的总引文,和最后一条的$smarty->display(“index.html”);最后结尾很容易忽略
附录
常用的总引文封装包